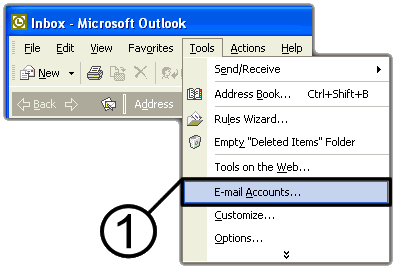
From Tools, click E-mail Accounts.
![]() In E-mail Accounts, click to select Add a new e-mail account.
In E-mail Accounts, click to select Add a new e-mail account.
![]() Click Next.
Click Next.
![]() In Server Type, click to select POP3.
In Server Type, click to select POP3.
![]() Click Next.
Click Next.
![]() In Internet E-mail Settings (POP3) under User Information, enter Your
Name and E-mail Address.
In Internet E-mail Settings (POP3) under User Information, enter Your
Name and E-mail Address.
![]() In Logon Information, enter your User Name and Password.
In Logon Information, enter your User Name and Password.
![]() For the Master POP account: The User Name must follow the format of
UserID.UserID, where "UserID" is the user ID that you use to log into
your Control Panel. Your password is your Control Panel password.
For the Master POP account: The User Name must follow the format of
UserID.UserID, where "UserID" is the user ID that you use to log into
your Control Panel. Your password is your Control Panel password.
or...
For additional POP accounts: The User Name must follow the format of POPID.UserID, where the "POP ID" is the POP ID that you used to create your POP account and the User ID is the User ID you use to log into your Control Panel. Your password is your POP account password.
![]() In
Server Information, enter your Incoming mail server (POP3) and Outgoing
mail server (SMTP). Server names are in the format
smtp.forexample-domain.com, where forexample-domain is your domain name.
In
Server Information, enter your Incoming mail server (POP3) and Outgoing
mail server (SMTP). Server names are in the format
smtp.forexample-domain.com, where forexample-domain is your domain name.
![]() Click More Settings.
Click More Settings.
![]() In the Internet E-mail Settings dialog box, click Advanced.
In the Internet E-mail Settings dialog box, click Advanced.
![]() Click
to clear Leave a copy of messages on the server. Click OK.
Click
to clear Leave a copy of messages on the server. Click OK.
![]() By disabling the Leave a copy of messages on the server option, your
e-mail client will automatically download your Inbox e-mail messages to your
local computer. We recommend you leave this option disabled to prevent old
e-mail messages from taking up your hosting account's limited disk space,
thereby reducing the chance that your account will experience an overage.
By disabling the Leave a copy of messages on the server option, your
e-mail client will automatically download your Inbox e-mail messages to your
local computer. We recommend you leave this option disabled to prevent old
e-mail messages from taking up your hosting account's limited disk space,
thereby reducing the chance that your account will experience an overage.
![]() Click Next.
Click Next.
![]() Click
Finish.
Click
Finish.